How to Schedule Appointments in OpenEMR
Manually managing and scheduling patient appointments can be frustrating, and probably leads to an increase in wait times. In today’s healthcare tech advancements like EMR help to manage and schedule patient appointments easily.
While there are many EMR systems available, OpenEMR stands out as the popular choice of providers. OpenEMR, an open-source electronic medical records system with an in-built scheduling feature allows providers to schedule appointments.
However, scheduling appointments involves a few steps. If you don’t know or are struggling to schedule patient appointments in OpenEMR, this blog post will guide you through the process.
What is Scheduling in OpenEMR?
OpenEMR is an open-source electronic medical records system that helps providers to store and manage patient data securely. However, OpenEMR doesn’t hold there, it goes beyond. It has various features that help providers in many ways, including appointment scheduling.
OpenEMR’s appointment scheduling feature enables providers to schedule patient appointments for clinical visits or telehealth visits for health consultations.
Using the appointment scheduling feature, providers can:
1. Well-organized
- The scheduling feature helps healthcare providers to keep track of all patient appointments in one place.
- This makes it easier to manage appointments and avoid double bookings.
2. Improve efficiency
- Providers can quickly see the appointment slots and book patients in with just a few clicks.
- This saves more time compared to manually maintaining a paper-based or disorganized calendar.
3. Enhance patient experience
- Patients can easily book appointments online via patient portals, making them more convenient.
- This can lead to higher patient satisfaction and better retention.
4. Automated reminders
- This feature also sends automatic reminders to patients via text message.
- In this way, providers can reduce the number of missed, forgotten appointments, or no-shows.
5. Better data tracking
- OpenEMR records all appointment details, which can be useful for generating reports and analyzing trends in clinical operations.
- This data can help providers to make more informed decisions to improve services.
How to Schedule Appointments in OpenEMR (Step-By-Step)
There are two ways you can easily schedule patient appointments. We’ll start with the first essential steps which also covers the second way.
Step 1: Download and Install OpenEMR
Starts by downloading and installing OpenEMR. It requires many complex steps which we’ve simply provided in this blog post. You can go through the OpenEMR installation process.
Moreover, the OpenEMR installation process varies for each device operating system for instance OpenEMR installation on Windows differs from MacOs.
Here are the necessary resources to read:
- The Ultimate Guide to OpenEMR Complete Installation 2024 (MacOS)
- How to Install OpenEMR on Windows 2024 (The Ultimate Guide)
- How to Install OpenEMR on Linux 2024
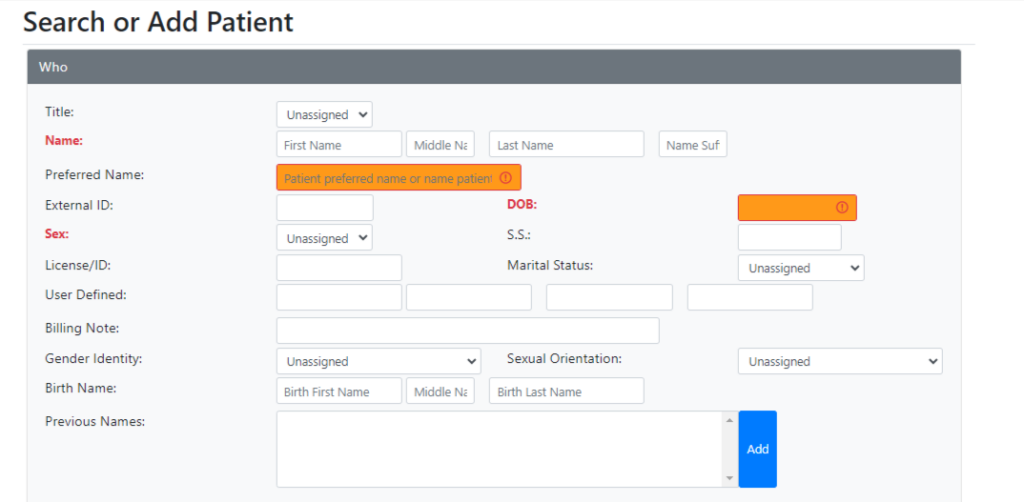
Step 2: Add Patient
- After completing the OpenEMR installation, add the patient.
- Enter all the necessary patient details like title, name of the patient, DOB, gender, and others.
- Select the contact option and enter all the necessary contact details of the patient.
- Then click the “create new patient” option.

Step 3: Go to Calendar
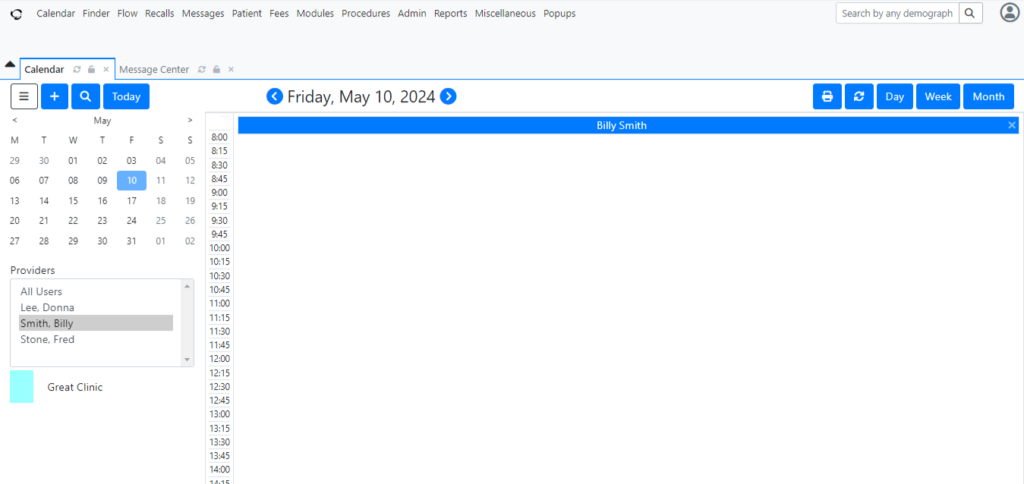
- After adding the patient, go to the calendar.
- Select the month and date of the appointment that needs to be scheduled for a particular patient.
- You can slide to the next month by clicking the arrow mark on the sides of the month.
- For instance, if you want to schedule an appointment in may month for a particular date and time, you can click the right-side arrow mark to go to the May month calendar.
- Select the date of the appointment.

Step 3: Select the timing of the appointment
- After selecting the month and date of the appointment, you can now select the timing of the appointment.
- You will see a 15-minute gap time frame dashboard on the screen.
- Select the timing of the appointment that needs to be scheduled for the patient,
- For instance, if the appointment needs to be scheduled for 10 am, click the time frame 10:00.

Step 4: Schedule Appointment for the Patient
- After clicking the timeframe, you will have an appointment popup form on the screen.
- This is where you need to enter all the necessary details of the appointments carefully.
- Make sure it matches with the patient you are scheduling the appointment for.
- You will have two options on the top – Patient and Provider. Click “patient”.

- Next, click the patient option which you can see below “facility” and “billing facility”.
- Click the “For” box and enter the patient name with whom you want to schedule an appointment.
- Carefully select the patient to avoid scheduling for any other patient.


Step 5: Enter appointment details
- After selecting the patient, enter all the other details to schedule the appointment.
- Choose the appointment category first like an office visit, new patient, health and behavioral assessment, or others.
- Then select the facility and the billing facility.
- Next, select the provider who is going to attend the patient’s appointment for health consultation.
- Going down you will see the date and time or all-day event options.
- You can choose based on the patient’s appointment.
- If it is a recurring appointment, you can choose the repeat option and select the next week’s day/date.

Step 6: Overview & Save
- After completing all the steps, have an overview of the details and click the save button.
- You will see the appointment has been scheduled on the time of date you have chosen.
And that’s all for appointment scheduling in OpenEMR.
CapMind’s Complete OpenEMR Service and Comprehensive Training
If you want to experience the full potential of OpenEMR, CapMinds is here with a comprehensive solution.
We have over 15 years of experience working with 500 clients in OpenEMR customization and integration. By utilizing our CapMinds service, you can enhance your practice management and improve patient outcomes.
- At CapMinds, OpenEMR custom solutions are developed with much curation and accuracy to match the special practice needs.
- It will be low-cost, and the perfect budget solution for your practice’s long-term future.
- CapMinds OpenEMR prioritizes secure data management & ensures compliance with industry regulations, offering healthcare providers peace of mind.
Get the best technologies and HIPAA-compliant and efficient OpenEMR that can be tailored to fit your practice from CapMinds.
Our OpenEMR services facilitate a Modern User Interface (UI), customization, production support & training. Also facilitates billing, report & specialty enhancements, clearing house integrations, e-prescription, cloud, and more.
“Get the most experienced, proven, and perfect professional support for your OpenEMR”


